In the previous post, we focused on the DevOps Deployment Pipeline Design phase. In this post, we are going to define the Deployment Pipeline Implementation phase.
Implementing the Deployment Pipeline
Once the deployment pipeline has been designed, it needs to be implemented. There are various ways to do this. I am going to discuss the use of Jenkins and several plug-ins for implementing pipelines. In this post, I am simply going to outline a potential implementation; the details of the implementation will be discussed in later articles.
My recommendation is that the implementation of the pipeline be carried out iteratively and incrementally, taking small steps and incorporating the different tasks into the pipeline.
Given that the version control server must be the process’s single source of truth, we are going to use Jenkins’ ability to store the description of the pipeline in a Jenkinsfile. Documentation for using Jenkinsfiles is available at https://jenkins.io/doc/book/pipeline/
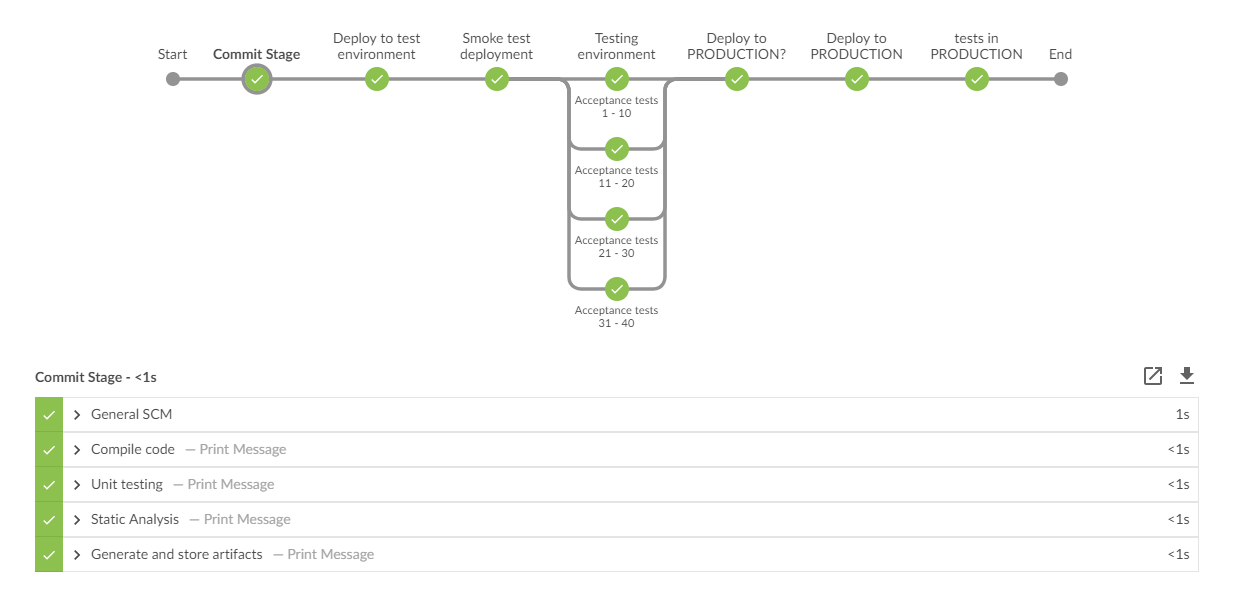
Using this functionality and the Blue Ocean plug-in, we obtain a pipeline like the one shown in the following image:

In the above example, we see that the pipeline has run without any problems. If, for example, we received an error when performing the deployment smoke test in the test environment, we would see the following:

In this case, the team would immediately see that some problem had occurred with the deployment.
Of course, the pipeline stops, and the subsequent steps are not executed, preventing the error from propagating to subsequent environments.
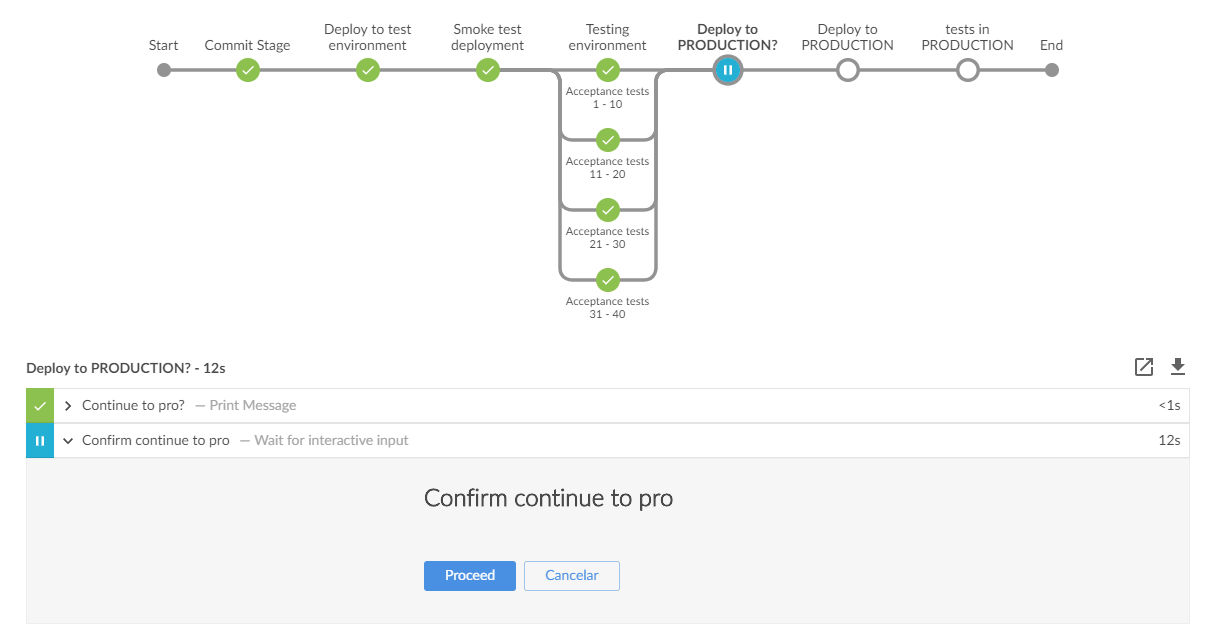
In the pipeline below, I have included a manual confirmation step that allows us to control whether we want the change to propagate to production:

With this confirmation step, I can control whether I really want to promote the change or not. If this manual check did not exist, instead of Continuous Delivery, I would be implementing Continuous Deployment, because any change made to the version server would reach production automatically if it passed all validations.
Considerations when setting up the Deployment Pipeline
As we have already seen, the first thing we need to do is use our Value Stream Map to work out which parts of it can be automated and model this with a tool that allows us to automate tasks and present them graphically. This last point is not strictly necessary, but it really helps with feedback because we can see at a glance the state of the pipeline.
As we mentioned in our post about using a dedicated DevOps team, one of this team’s main tasks is to design, implement and maintain this pipeline. Once this is done, it is the development/operations team's job to ensure that the status of the pipeline is always correct. The entire team owns and is responsible for the pipeline and its status.
To set up the pipeline, my recommendation is to start with a skeleton definition that shows the stages and incrementally and iteratively add tasks to those stages.
The Andon Cord or Stop the Line
An important consideration when working with the pipeline is that, if the pipeline goes into a failed (red) status at any time, the entire team should stop until the pipeline returns to a normal (green) status. This way of working is equivalent to the use of the Andon Cord in the Toyota Production System (TPS), by which each worker can stop the entire manufacturing line in the event that he or she detects an error that may affect the quality of the product. In fact, it is said that in a Toyota manufacturing plant you can pull the Andon Cord thousands of times a day!
This concept seems radical but has enormous benefits. These include encouraging swarming and with it, teamwork, while ensuring that we always have a line capable of delivering value to production.
Summary
In this post, we have briefly introduced what a Deployment Pipeline is along with the benefits of using one. We have seen a small-scale example of implementing a pipeline based on the Jenkins tool. The concept of the Andon Cord, essential when working with the deployment pipeline, was also introduced.
In upcoming articles, we will examine some of the stages in greater detail, analysing different options and their implementation.
Emiliano Sutil is a Project Manager at Xeridia


